Sow What? Winter’s Secret to Spring Surprises
- ganavarie2025

- Dec 7, 2025
- 4 min read

As we cycle into the deepest days of winter respite, I’m anything but respiting. No, while the world around me is quieting down, I’m gearing up—preparing to sow the seeds for my spring flings: tomatoes, okra, peas, eggplants, peppers, squash, and anything else that catches my fancy.
Now, before you think I’ve completely lost my gardening mind, let me claify -

these aren’t the same seeds I’ve talked about sowing directly into the winter earth for overwintering. Those hardy varieties can handle cold soil and freezing nights.
These spring-loving vegetables, however, would absolutely perish if planted straight into the winter ground. Yet, paradoxically, they thrive when started outdoors in what I affectionately call their “mini greenhouses.” And the best part? They’re usually ready well before nurseries and garden centers parade their seedlings for purchase.
I’ve learned over the years that if I wait until spring—or until stores finally roll out their seedlings—I’m already behind where I want (and need) to be. So for several seasons now, I’ve embraced the magic of Winter Sowing, and it has worked beautifully for vegetables and other plants that dislike the cold, damp, darker days ahead.
Many gardeners have already discovered this method and its simple “sow and stake” approach. But for those of you who are new to winter sowing, I encourage you to give it a try. Start small. Experiment. See how it works for you. It’s truly one of the easiest, lowest-maintenance ways to get a jump-start on spring.
What You Need to Get Started
Winter sowing doesn’t require fancy tools or expensive equipment. In fact, some of the most effective supplies are items you likely already have around the house.
You will need:
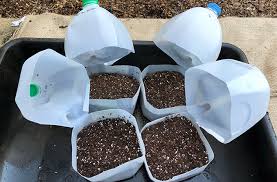
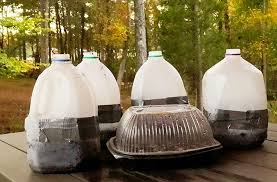
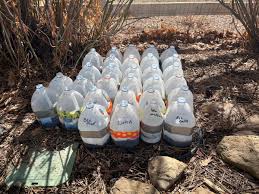
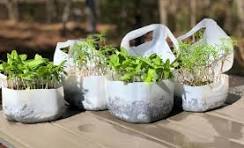
Clean, clear or translucent plastic containers (milk jugs, juice jugs, 2–liter bottles, rotisserie chicken containers, clear salad boxes) (Some people have used plastic freezer bags with success. I have not tried this yet. I may next year.)
A sharp knife or box cutter
Potting mix (outdoor or seed-starting mix—NOT garden soil - I'd get the cheapest organic I could find)
Seeds


Duct tape or waterproof tape
A permanent marker - i recommend oil based or paint based. Permanent markers fade.
A spray bottle or watering can
A drill, nail, or hot metal skewer for making drainage holes


How to Create Your Mini Greenhouses
Prepare the containers.
Rinse them well. Using a knife or cutter, slice the container horizontally—leaving about 1–2 inches connected on the back to act as a “hinge.” Leave the top or cap off so snow and rain can enter naturally.
Add drainage holes.
Poke or drill several drainage holes in the bottom. Winter sowing only works if excess water has a way to escape.
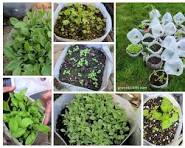
Fill with soil.
Add 3–4 inches of moist potting mix. Not soggy—just damp like a wrung-out sponge.
Sow your seeds.
Follow packet instructions. Sow a little more densely than you would in spring because you’ll thin and separate seedlings later.
Water lightly.
Use a spray bottle or gentle watering to settle the seeds.
Close and tape.
Close the lid and secure it with duct tape, leaving the top open for ventilation and natural moisture.
Label well. VERY IMPORTANT
Write on the container with permanent marker (oil or paint marker), because winter sun fades labels surprisingly fast. I also put a 3x5 card inside a plastic snack bag and duct tape it to the container with the written side facing the container.

oh no! There’s nothing more disappointing that opening your containers and not knowing what on earth you have. I’ve done this so I can tell you that most young seedlings look very much alike.
Let Nature Do the Work
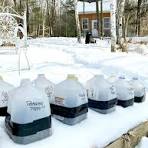
Once your seeds are nestled inside their mini greenhouses, place the containers outside where they can receive the full experience of winter—sun, rain, sleet, snow, and whatever else Mother Nature feels like tossing our way.
And then? Walk away.
This is the beauty of winter sowing: it’s incredibly low maintenance. The seeds remain protected, and the fluctuating winter temperatures help plants develop naturally with built-in cold stratification when needed.
One Important Caveat
When early spring arrives and temperatures begin to warm, seedlings will start to appear. At this stage, they’re tender and vulnerable.
If the weather takes a sudden dip back down into freezing temperatures (and it often does), cover your containers with a sheet, towel, or tarp overnight. The seedlings are strong but not frost-proof.
Transplanting in Spring
Once all danger of frost has passed and your garden beds are ready, it’s time for the grand reveal.
Open your containers and gently loosen the soil. You’ll usually find strong, well-hardened seedlings with sturdy stems and vibrant green leaves—plants that are ready to grow without the shock that often accompanies indoor-started seedlings.
Simply:
Separate the clumps
Transplant into your garden or raised beds
Water them in well
Because they’ve been outdoors since seed stage, they’re already acclimated to the elements and transition beautifully.
Why Winter Sowing Works So Well
Less fuss, more success. No grow lights, no seed trays underfoot.
Stronger seedlings. Outdoor-grown seedlings are naturally sturdy and resilient.
Earlier crops. You'll be ahead of the stores and the season.
Space-saving. Your kitchen remains seed-tray-free.
Weatherproof method. Snow insulates, cold strengthens, and nature waters.
Winter sowing gives gardeners a way to participate in the sacred rhythm of the winter-to-spring transition. Even while the world sleeps under frost and quiet skies, our tiny seedlings are preparing silently for their moment of emergence.
If you’ve never tried winter sowing, this is the year. Start with one milk jug. One packet of seeds. One experiment.
You may find, as I have, that the quietest season holds the earliest promise of spring.


Comments